PART 9 — BUSINESS SETTINGS
Navigation: Sidebar → Business Settings
Business Settings contains eight configuration sub-sections.
9.1 General Settings
URL: /settings (General tab)
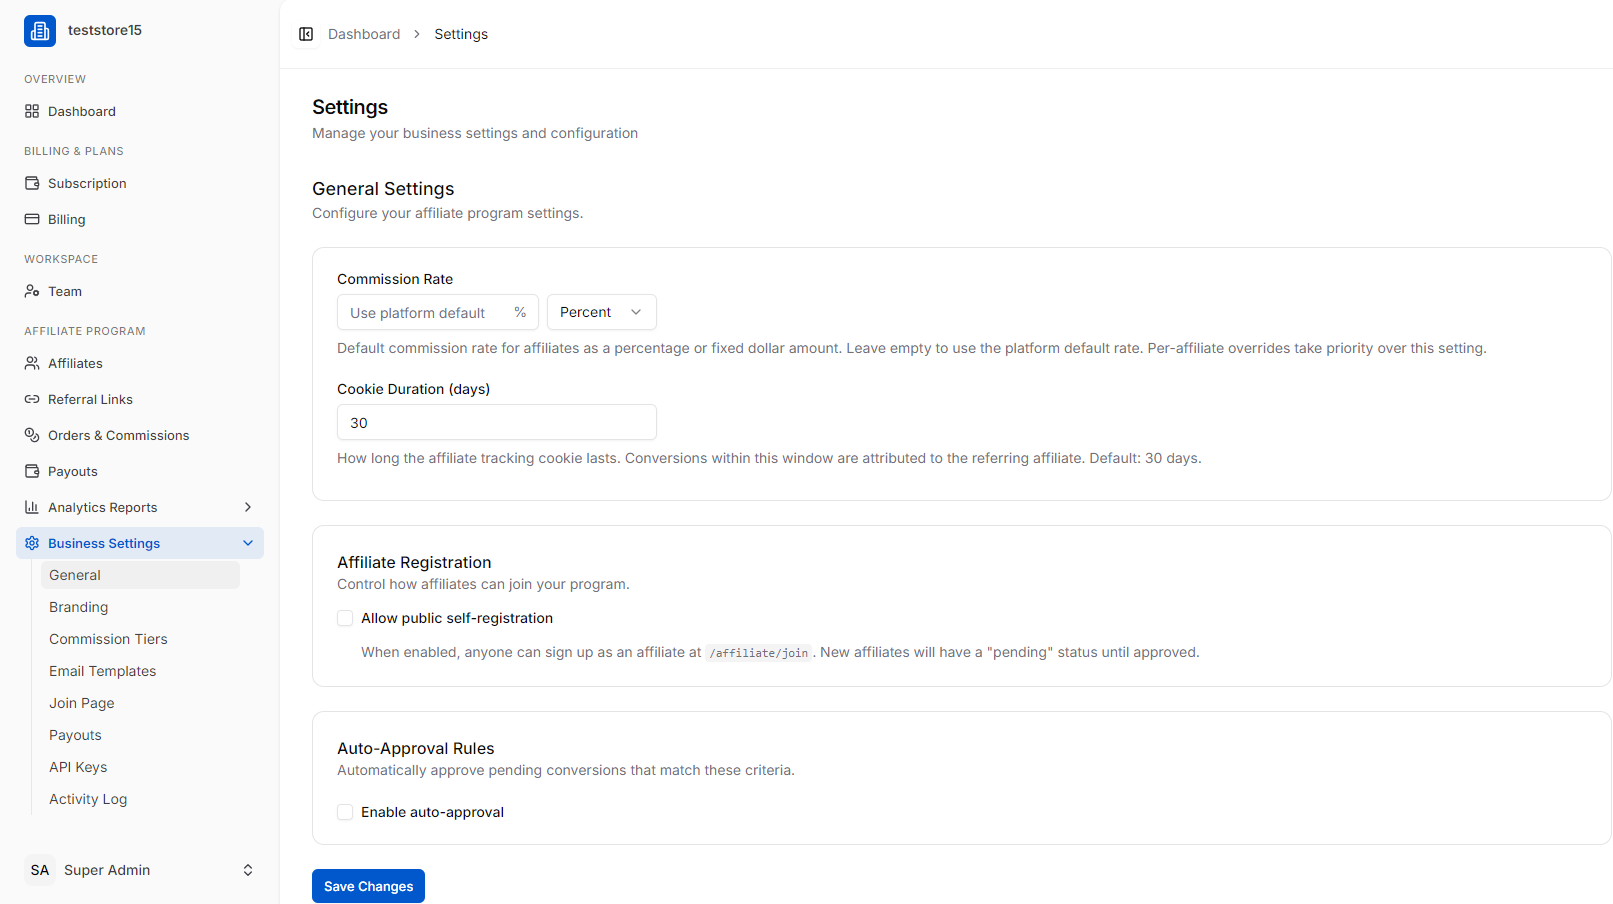
Configure the core affiliate program behaviour:
Commission Rate — Set a default commission rate (% or fixed $). Leave empty to use the platform default. Per-affiliate overrides take priority.
Cookie Duration (days) — How long the affiliate tracking cookie lasts (default: 30 days). Any conversion within this window is attributed to the referring affiliate.
Affiliate Registration — Toggle “Allow public self-registration” to let anyone apply as an affiliate at /affiliate/join. New affiliates will have “pending” status until approved.
Auto-Approval Rules — Enable auto-approval to automatically approve conversions that match set criteria. This reduces manual review workload.
Click “Save Changes” after making any modifications.
9.2 Branding
Customise the affiliate-facing portal with your own logo, colours, and brand identity. On Basic plan and above, you can use a fully custom domain (affiliates.yourbrand.com).
Page Overview: Branding Settings
The Branding page allows business administrators to customize the visual identity and appearance of their specific business panel. This ensures that the workspace aligns with the company’s corporate identity guidelines.
Navigation Path
Dashboard > Settings> Branding
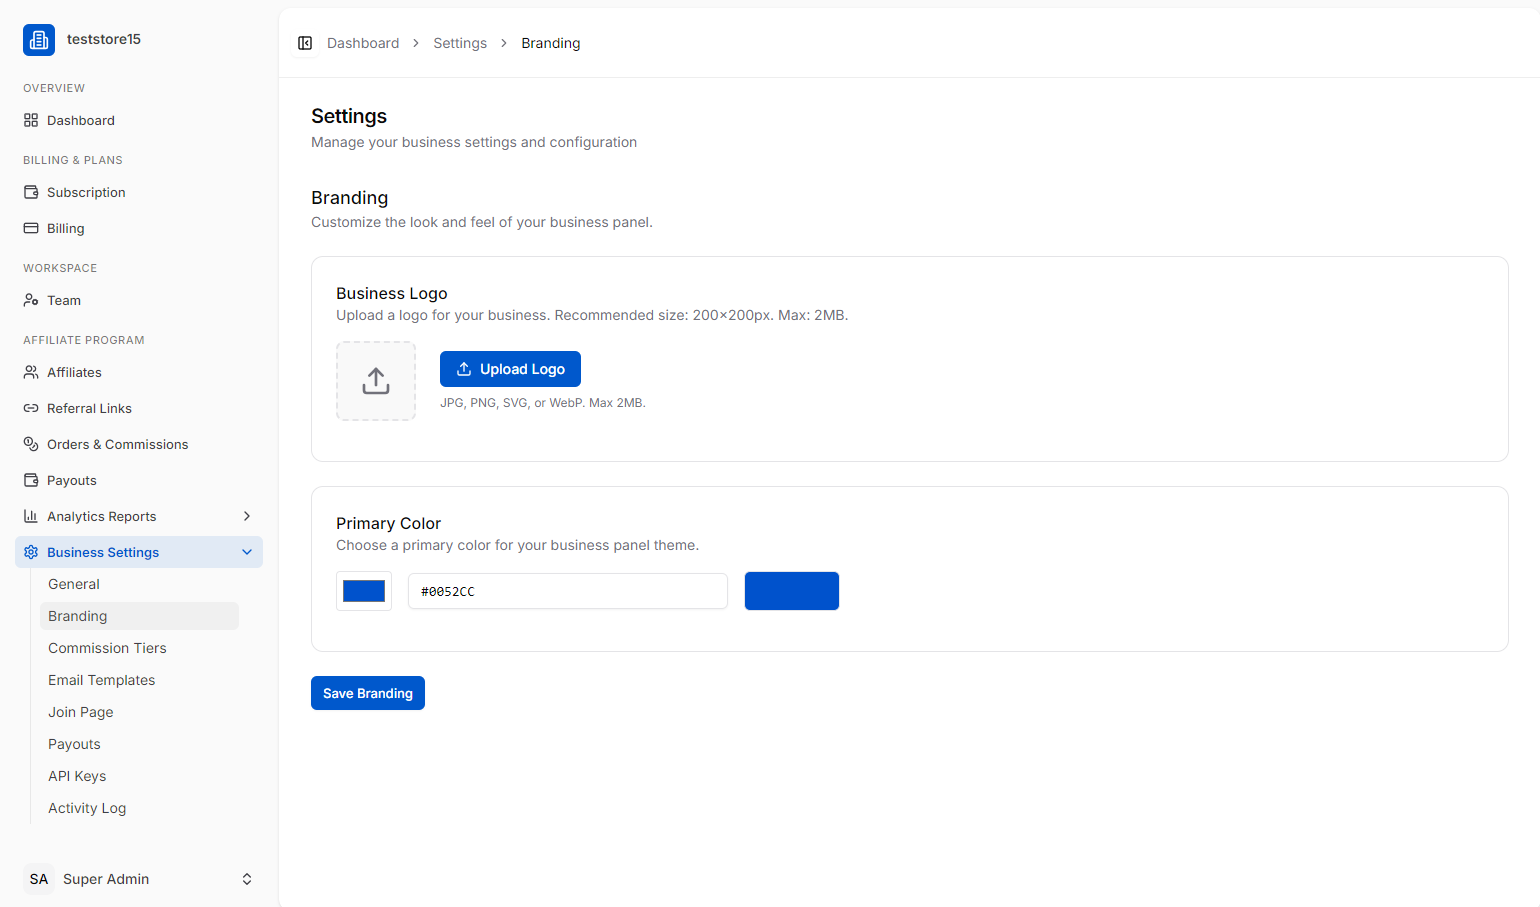
Key Interface Components
1. Header & Context
- Page Title: Settings
- Sub-heading: “Manage your business settings and configuration”
- Section Title: Branding
- Section Description: “Customize the look and feel of your business panel.”
2. Business Logo Configuration Card
This section handles the upload and management of the primary brand asset.
- Upload Area: Features a drag-and-drop icon box along with an explicit “Upload Logo” call-to-action button.
- Supported File Formats: JPG, PNG, SVG, or WebP.
- System Constraints: * Recommended Size: $200 \times 200\text{px}$
- Maximum File Size: $2\text{MB}$
3. Theme Customization (Primary Color)
This section defines the accent color used across the user interface elements (buttons, active states, highlights).
- Color Input Field: A text box allowing manual entry of hex color codes (e.g., #0052CC).
- Color Picker Preview: Includes a visual color swatch block reflecting the currently selected hex color.
4. Action Control
- “Save Branding” Button: A prominent primary action button located at the bottom left of the configuration forms to commit changes to the database.
9.3 Commission Tiers
Set up tiered commission structures — reward top-performing affiliates with higher rates. Supports flat, percentage, recurring, multi-tier, and per-product models.
Navigation Path
Dashboard > Settings>Commission Tiers
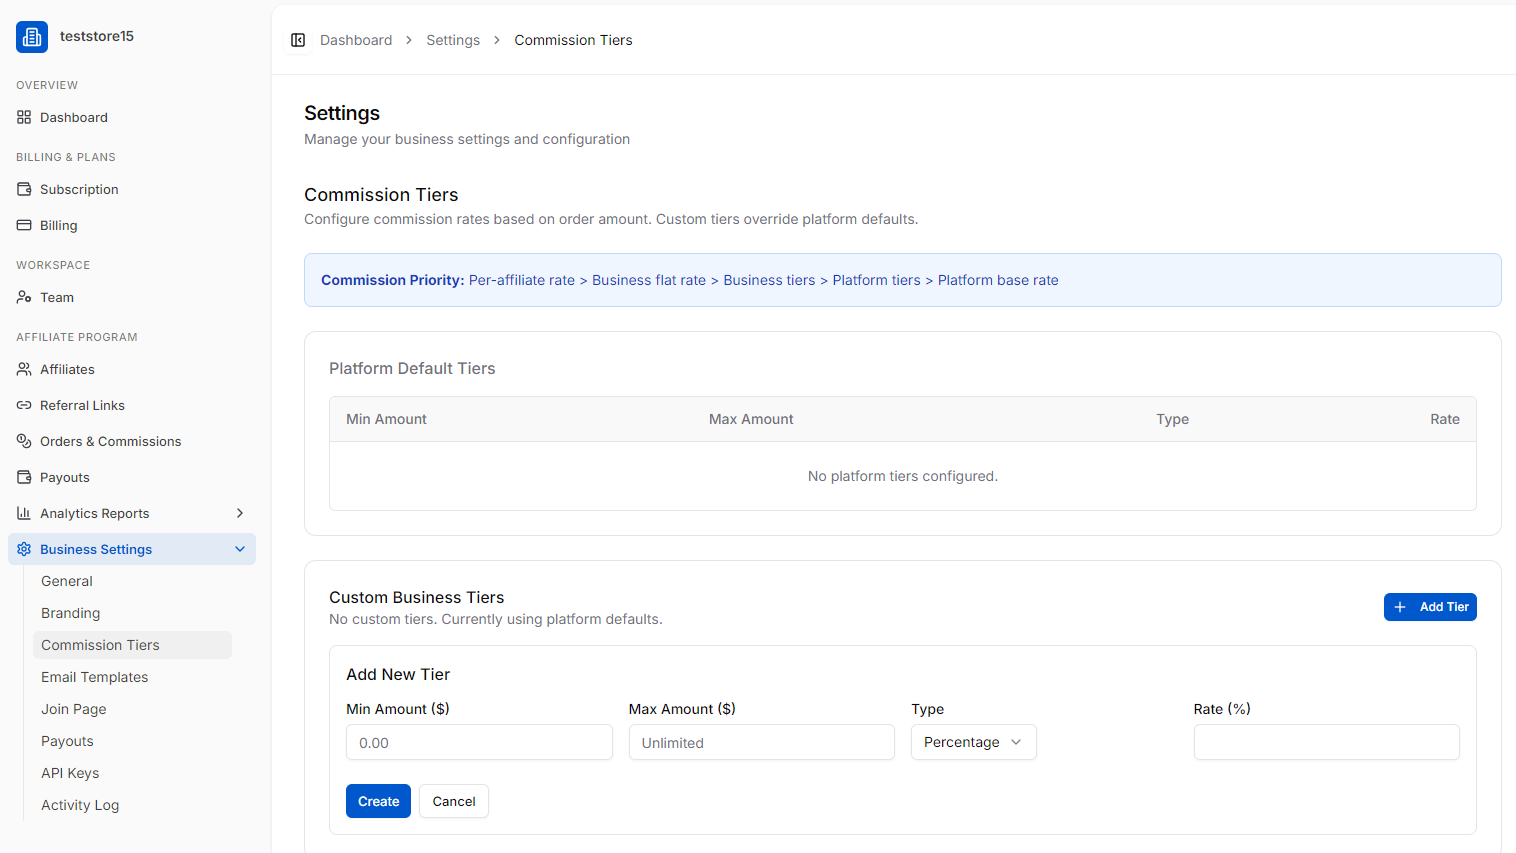
Key Interface Components
1. Header & Business Logic Overview
- Page Title: Settings
- Sub-heading: “Manage your business settings and configuration”
- Section Title: Commission Tiers
- Section Description: “Configure commission rates based on order amount. Custom tiers override platform defaults.”
- Commission Priority Banner: Displays the system’s rule-execution hierarchy:
Commission Priority: Per-affiliate rate $>$ Business flat rate $>$ Business tiers $>$ Platform tiers $>$ Platform base rate
2. Platform Default Tiers Table
This section displays default, platform-wide tiers if they exist.
- Table Columns: Min Amount, Max Amount, Type, Rate.
- Current State: Empty state message reading “No platform tiers configured.”
3. Custom Business Tiers Card
This dynamic section is used for managing business-specific rules. It currently displays a sub-text notification: “No custom tiers. Currently using platform defaults.”
- “+ Add Tier” Button: A primary action button used to toggle or create additional tier configuration blocks.
4. Add New Tier Form
An active input area used to establish a new custom payout rule:
- Min Amount ($): Numeric input box initialized at 0.00.
- Max Amount ($): Numeric input box initialized at Unlimited.
- Type: A dropdown menu currently showing Percentage (typically options include flat fee or percentage formats).
- Rate (%): An empty text input box for defining the payout value.
- Form Actions: Contains a blue “Create” submission button and a neutral “Cancel” button.
9.4 Email Templates
Customise all automated emails sent to affiliates — welcome emails, payout notifications, approval notices, etc.
Navigation Path
Dashboard > Settings> Email Templates
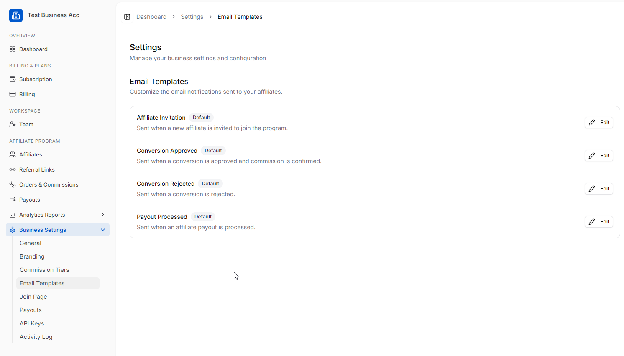
Key Interface Components
1. Header & Context
- Page Title: Settings
- Sub-heading: “Manage your business settings and configuration”
- Section Title: Email Templates
- Section Description: “Customize the email notifications sent to your affiliates.”
2. Template Configuration List
This area displays a clean, row-based list of available system email events. Every list item features a dedicated “Edit” button alongside a grey “Default” badge indicating that the system’s baseline layout is currently active.
- Affiliate Invitation: * Description: “Sent when a new affiliate is invited to join the program.”
- Conversion Approved: * Description: “Sent when a conversion is approved and commission is confirmed.”
- Conversion Rejected: * Description: “Sent when a conversion is rejected.”
- Payout Processed: * Description: “Sent when an affiliate payout is processed.”
9.5 Join Page
Configure the public affiliate application/signup page. Customise the fields, messaging, and approval process.
Navigation Path
Dashboard > Settings > Join Page

Key Interface Components
1. Header & Context
- Page Title: Settings
- Sub-heading: “Manage your business settings and configuration”
- Section Title: Join Page Settings
- Section Description: “Customize the public affiliate join page for your business.”
2. Welcome Message Configuration Card
This form panel handles the informational messaging presented to prospective affiliates.
- Card Sub-header: “Welcome Message”
- Card Description: “This message is displayed on the public affiliate join page to attract potential affiliates.”
- Welcome Text Field: A large text input field for custom copy.
- Current Input: “This is the affiliate Join page”
- Character Counter: Displays 31 / 1000, indicating a maximum capacity of 1,000 characters.
- Integrated UI Element: Features an embedded toggle/icon pill badge on the far right edge of the input area.
3. Action Control & State Indicator
- “Save Join Page” Button: A blue primary action button used to commit text updates.
- Status Label: A neutral inline text reading “Saved.” sits immediately next to the action button, confirming the latest changes are successfully updated in the system database.
9.6 Payouts (Settings)
The Payouts configuration page allows business administrators to determine how and when financial payouts are generated and distributed to their affiliates. This section controls schedules, limits, and automation rules, which can be configured to override system-wide defaults.
Navigation Path
Dashboard >Settings > Payouts
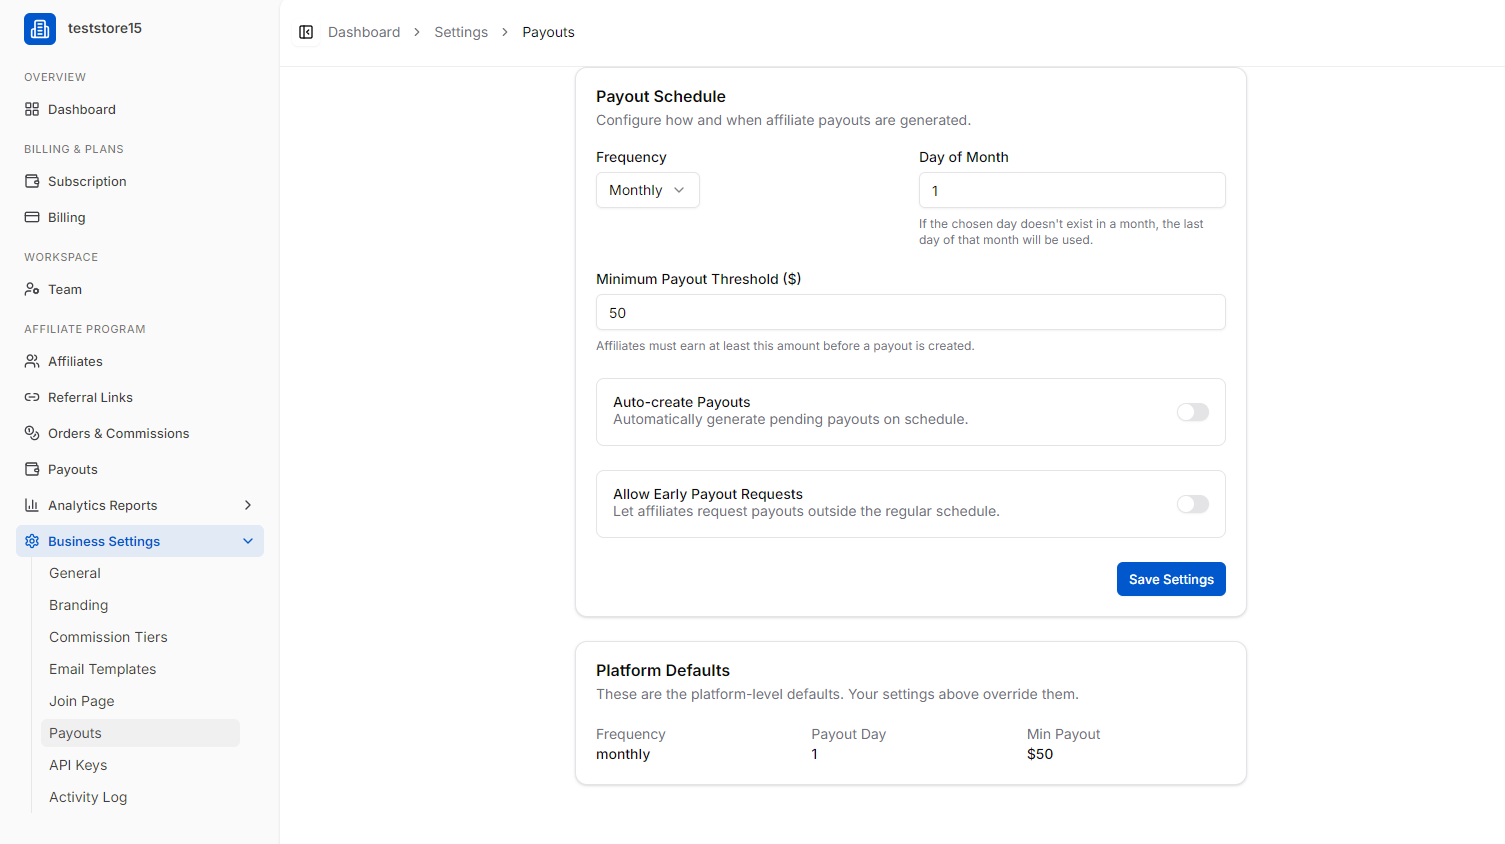
Key Interface Components
1. Payout Schedule Configuration Card
This card handles the core scheduling preferences and automation options for processing affiliate revenue.
- Section Title: Payout Schedule
- Section Description: “Configure how and when affiliate payouts are generated.”
- Frequency Dropdown: Controls how often payouts occur. It is currently configured to Monthly.
- Day of Month Input: A numeric text field setting the specific execution date. It is currently set to 1.
- System Note: “If the chosen day doesn’t exist in a month, the last day of that month will be used.”
- Minimum Payout Threshold ($): A text input field specifying the minimum balance an affiliate must accumulate before a payout file is built. It is currently set to 50.
- System Note: “Affiliates must earn at least this amount before a payout is created.”
- Auto-create Payouts Toggle: An on/off toggle switch to “Automatically generate pending payouts on schedule.” Currently toggled off.
- Allow Early Payout Requests Toggle: An on/off toggle switch to “Let affiliates request payouts outside the regular schedule.” Currently toggled off.
- “Save Settings” Button: A prominent blue action button used to save changes made within this card.
2. Platform Defaults Read-Only Card
This lower section provides visibility into the baseline platform settings for reference.
- Section Title: Platform Defaults
- Section Description: “These are the platform-level defaults. Your settings above override them.”
- Default Metrics Displayed:
- Frequency: monthly
- Payout Day: 1
- Min Payout: $50
9.7 API Keys
The API Keys page features a modal configuration overlay that allows developers and business administrators to generate authentication tokens for external third-party integrations. This view manages the fine-grained access permissions (scopes) assigned to each generated key.
Navigation Path
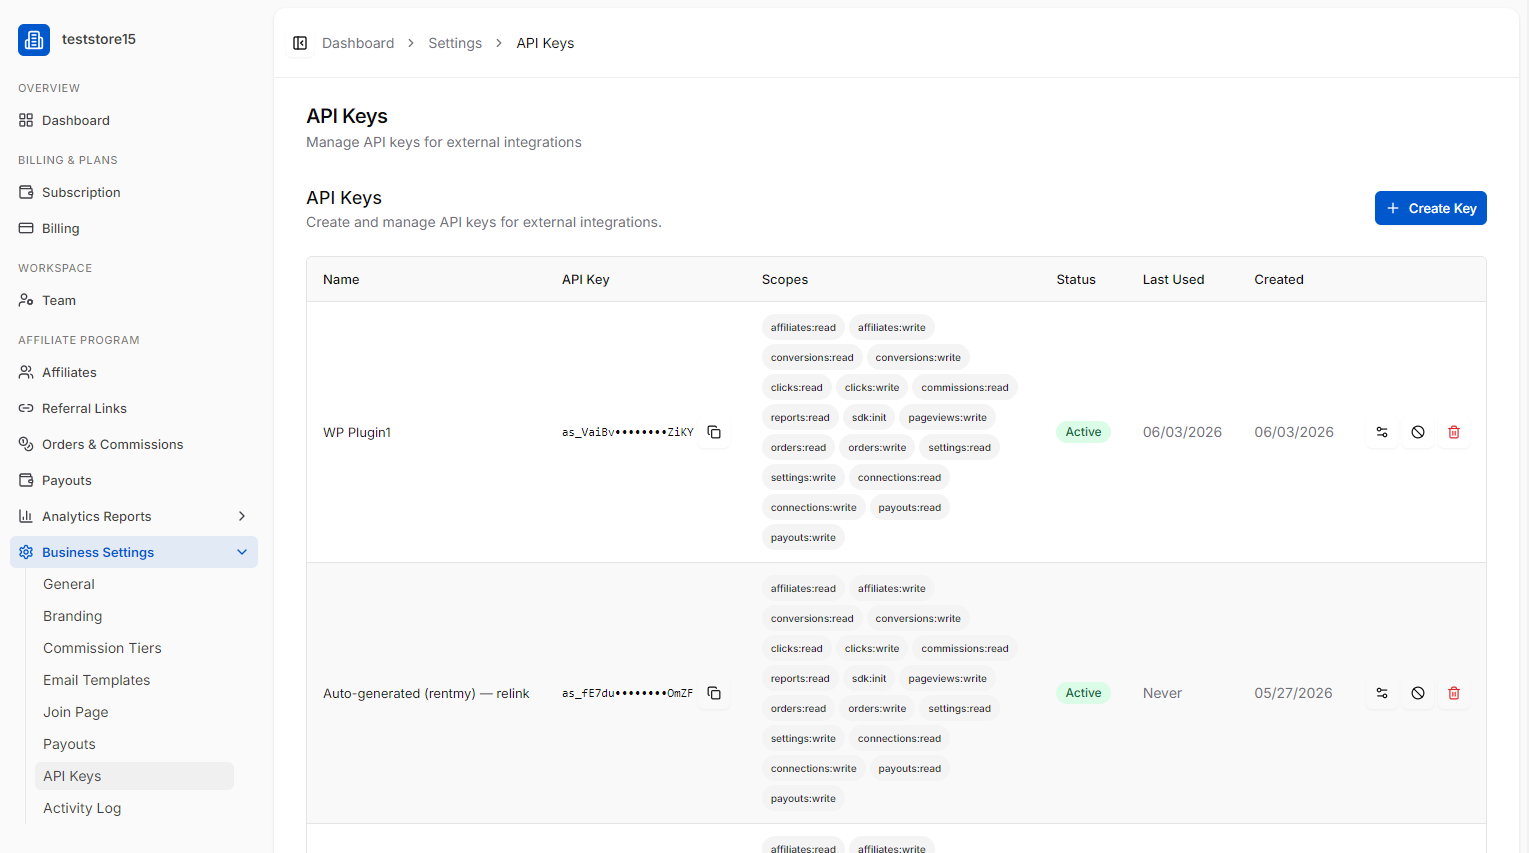
Dashboard > Settings > API Keys > Click + Create Key
Key Interface Components
1. Background Content (API Keys Table View)
The primary screen behind the modal displays a standard table layout for active keys.
- Page Title: API Keys
- Page Sub-heading: “Manage API keys for external integrations.”
- Table Column Headers: Name, API Key, Last Used, Created.
- Action Header Control: A blue “+ Create Key” button triggers the creation form overlay.
2. “Create API Key” Modal Window
A centralized dialog card that handles the parameters required to build a secure integration connection.
- Modal Title: Create API Key
- Modal Sub-heading: “Generate a new API key for external integrations.”
- Close Control: An “X” close button is located in the upper right-hand corner to dismiss the modal.
Form Fields:
- Name Input Field: A text box for assigning a recognizable title to the key. Includes placeholder text: e.g. Production Integration.
- Scopes Section: A tag-cloud style selection matrix where administrators click individual permission pill badges to define access capabilities. Available scopes include:
- Affiliate Rules: affiliates:read, affiliates:write
- Conversion Rules: conversions:read, conversions:write
- Clicks & Commissions: clicks:read, clicks:write, commissions:read
- Reporting & Analytics: reports:read, sdk:init, pageviews:write
- Orders & System: orders:read, orders:write, settings:read, settings:write
- External Linking: connections:read, connections:write
- Financial Rules: payouts:read, payouts:write
Action Controls:
- “Cancel” Button: A neutral secondary button that drops unsaved configuration changes and closes the modal view.
- “Create Key” Button: A blue primary call-to-action button that confirms entries, communicates with the API service layer, and prints the unique secure token string.
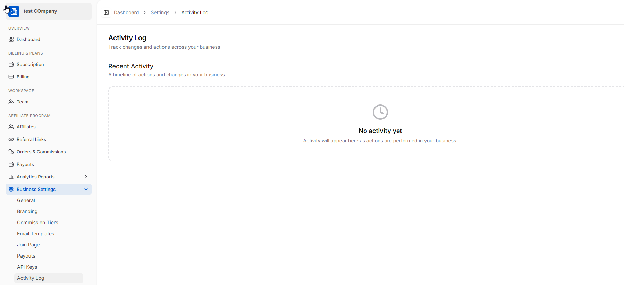
9.8 Activity Log
A complete audit trail of all actions taken in your account — logins, settings changes, affiliate approvals, payout triggers, etc.